
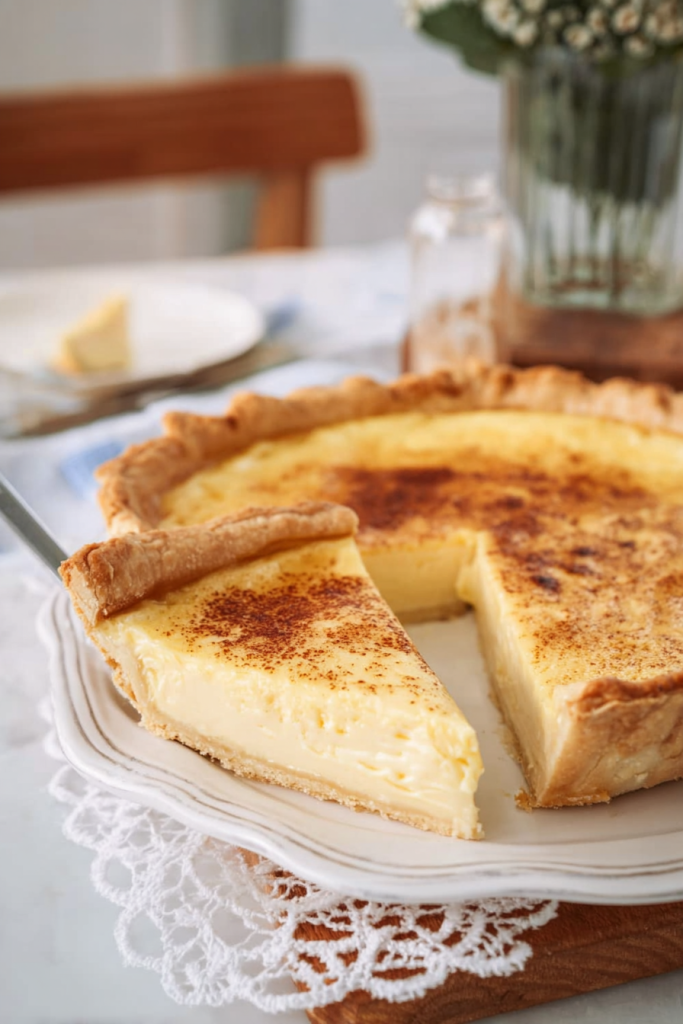
Custard pie is pure comfort in every bite. I’ve perfected this recipe to deliver the silkiest, most luscious custard filling wrapped in a golden, flaky crust.
I spent weeks testing different ratios and techniques to create the ultimate custard pie. The key is understanding the science behind custard making. When you get it right, you’ll have a dessert that slices beautifully and melts on your tongue.
My family now requests this pie for every holiday gathering. The combination of creamy custard and buttery crust never disappoints.
Why You’ll Love This Custard Pie Recipe
This recipe delivers foolproof results every single time. The custard sets perfectly with a silky texture that’s never rubbery. You’ll impress guests with minimal effort.
The flaky crust complements the smooth filling beautifully. Each slice holds its shape while remaining tender and creamy. It’s the perfect balance of textures.
I’ve included detailed troubleshooting tips throughout. You’ll understand exactly what to look for at each stage. This knowledge ensures success whether you’re a beginner or experienced baker.
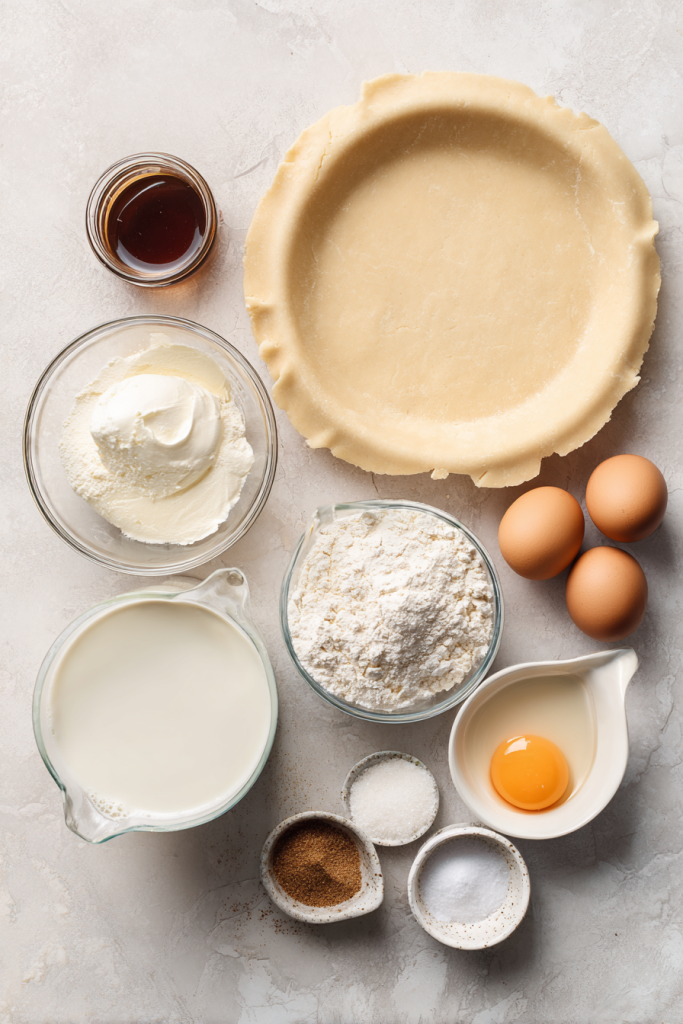
Ingredients for Custard Pie
This recipe uses simple, quality ingredients for maximum flavor. I tested multiple combinations before settling on this perfect ratio. Each component plays a crucial role in the final result.
Homemade Pie Dough – A flaky crust provides the perfect foundation. You can make it from scratch or use store-bought. Either way, proper blind baking is essential.
Eggs – I use four large eggs plus one extra yolk. This ratio creates the ideal custard consistency. Free-range eggs provide the best flavor and color.
Heavy Cream – Rich cream makes the custard luxuriously smooth. Don’t substitute with lower-fat options. The full fat content is necessary for proper texture.
Whole Milk – Combined with cream, milk balances richness with lightness. Whole milk is essential here. Skim or low-fat versions won’t produce the same results.
Granulated Sugar – White sugar sweetens without overwhelming the delicate custard flavor. I prefer superfine sugar as it dissolves more easily. Regular granulated works well too.
Vanilla Bean Paste – This adds incredible depth and visual appeal. Vanilla extract works perfectly if that’s what you have. Either option infuses the custard with warm flavor.
Nutmeg – Freshly grated nutmeg provides the classic finishing touch. Ground nutmeg is convenient and tastes wonderful. Just a light dusting on top is perfect.
Salt – A small amount enhances all the other flavors. It balances the sweetness beautifully. Don’t skip this ingredient.
Recipe Timing & Details
| Metric | Time/Amount |
|---|---|
| Prep Time | 30 minutes |
| Cook Time | 55 minutes |
| Chill Time | 4 hours |
| Total Time | 5 hours 25 minutes |
| Servings | 8 slices |
| Difficulty | Medium |
Ingredients Table
| Ingredient | Quantity | Notes |
|---|---|---|
| Pie Dough | 1 recipe | Homemade or store-bought for 9-inch pie |
| Egg Wash | 1 egg + splash milk | For brushing crust |
| Large Eggs | 4 | Plus 1 additional yolk |
| Large Egg Yolk | 1 | Extra for richness |
| Heavy Cream | 1¼ cups (300ml) | Full-fat only |
| Whole Milk | 1¼ cups (300ml) | Not low-fat |
| Granulated Sugar | ¾ cup (150g) | Superfine preferred |
| Vanilla Bean Paste | 2 teaspoons | Or vanilla extract |
| Salt | ¼ teaspoon | Enhances flavor |
| Ground Nutmeg | ¼ teaspoon | Plus extra for topping |
Recommended Equipment
A deep-dish 9-inch pie plate works best for this recipe. The extra depth accommodates all the custard filling. Make sure it’s oven-safe for the long baking time.
You’ll need pie weights or dried rice for blind baking. This prevents the crust from puffing up. Ceramic pie weights are reusable and work wonderfully.
A fine-mesh sieve is essential for straining the custard. This removes any cooked egg bits for ultra-smooth texture. A pastry brush helps apply egg wash evenly.
DETAILED INSTRUCTIONS
Preparing the Pie Crust
The foundation of great custard pie starts with proper crust preparation. This step cannot be rushed. Taking time here prevents soggy bottoms and ensures a crisp, golden shell.
Make the Pie Dough
Prepare your pie dough at least two hours ahead. Overnight chilling produces even better results. The dough needs time to rest and hydrate properly.
Use a flaky pie crust recipe or your favorite dough. Store-bought options work fine if you’re short on time. Just make sure it’s a quality product.
Roll the Dough
Lightly flour your work surface before rolling. Roll the dough to about ⅛ inch thickness. Keep the circle as even as possible.
Trim edges to create a circle 1-2 inches wider than your pan. This extra dough becomes the crimped edge. Gently transfer the dough to your 9-inch pie plate.
Press the dough lightly into all corners and up the sides. Avoid stretching it as this causes shrinkage during baking. Work gently to maintain the flaky layers.
Crimp and Chill
Tuck edges under and crimp decoratively if desired. A simple crimped edge looks beautiful and holds its shape. Press firmly so the edge won’t collapse.
Dock the bottom with a fork all over. This prevents large air bubbles from forming. Make the holes close together but don’t puncture through completely.
Refrigerate the prepared crust for 30 minutes minimum. This firms up the butter in the dough. Cold dough holds its shape better during baking.
Blind Bake the Crust
Preheat your oven to 425°F while the crust chills. Line the cold crust with parchment paper. Fill it completely with pie weights or rice.
Make sure weights go all the way up the sides. This prevents shrinking during the initial bake. Put the weighted crust back in the fridge for 10 minutes.
Bake for 15-18 minutes until edges look lightly golden. The bottom won’t be done yet, that’s normal. Remove from oven and reduce temperature to 375°F.
Carefully lift out the parchment and weights. Brush the warm crust bottom with egg wash. This creates a moisture barrier against the custard filling.
Return to the oven for 5-7 minutes more. The crust should look dry and light golden inside. Let it cool while you prepare the filling.
Turn oven down to 325°F for the final custard baking. This lower temperature prevents curdling. Have everything ready before mixing the custard.
Making the Custard Filling
The custard requires careful attention to temperature and technique. Following these steps ensures a perfectly smooth, silky result. Don’t rush through this process.
Whisk Eggs and Sugar
Combine four whole eggs, one egg yolk, and sugar in a medium bowl. Whisk together until just combined and smooth. Don’t whisk vigorously or incorporate air.
Never let eggs and sugar sit together without whisking immediately. Sugar can actually burn the egg yolks on contact. This creates lumps that won’t dissolve later.
Scald the Milk Mixture
Pour milk, heavy cream, and vanilla into a saucepan. Place over medium heat and whisk slowly. Watch carefully as it heats up.
You want the mixture to reach scalding temperature. You’ll see steam rising and tiny bubbles around the edges. Do not let it boil or it may curdle.
Scalding is crucial for several reasons. It denatures milk proteins for better texture. It also tempers the eggs gradually, preventing scrambling.
The hot milk infuses the vanilla more deeply too. This extra step takes only minutes but dramatically improves results. Don’t skip it even if you’re tempted.
Temper the Eggs
This step requires patience and a steady hand. Drizzle just a small amount of hot milk into the egg mixture. Whisk immediately to incorporate it.
Continue adding hot milk very gradually. Keep whisking between each addition. This slowly raises the egg temperature without cooking them.
If you add hot milk too quickly, you’ll scramble the eggs. Take your time with this process. Once half the milk is incorporated, you can add the rest more quickly.
Strain and Season
Pour the entire mixture through a fine-mesh sieve. Use a bowl with a spout if you have one. This catches any bits of cooked egg or vanilla seeds.
The straining step ensures absolutely smooth custard. Even careful tempering sometimes creates tiny lumps. The sieve catches everything for perfect texture.
Add salt and stir gently. Taste the mixture at this point. It should be sweet with a hint of vanilla and warmth from the nutmeg you’ll add later.
Assembling and Baking
Fill the Pie
Pour the strained custard into your par-baked pie shell. Fill it as full as possible without overflowing. The custard won’t rise much during baking.
Sprinkle ground nutmeg evenly over the entire surface. Use a light hand with the nutmeg. Too much can overwhelm the delicate custard flavor.
Brush the exposed crust edges with remaining egg wash. This gives them a beautiful golden sheen. It also helps prevent over-browning during the long bake.
The Baking Process
Carefully transfer the filled pie to the 325°F oven. Move slowly to avoid splashing custard. Even placement on the center rack works best.
Bake for 40-50 minutes, checking after 35 minutes. Actual time varies based on your oven and pie depth. Learn to recognize visual cues rather than relying solely on time.
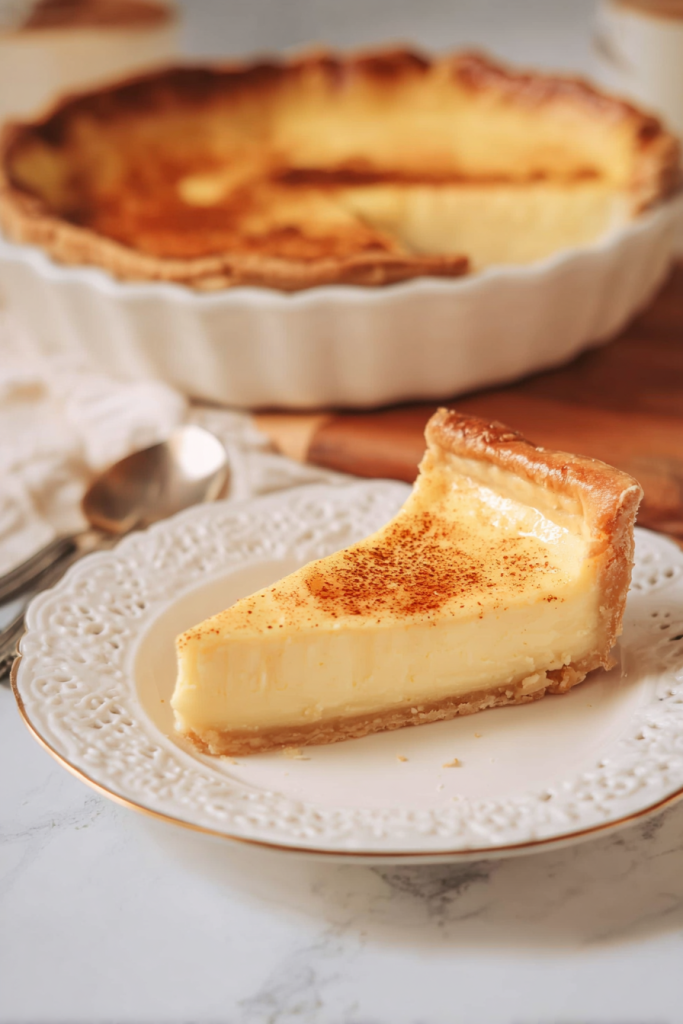
The outer edge should be set and firm. The center should still jiggle significantly when gently tapped. This wobble is exactly what you want.
Remember that custard continues cooking as it cools. Taking it out while still jiggly ensures perfect texture later. If you wait until it’s fully set, it will overcook.
Cooling and Chilling
Let the pie cool completely at room temperature. This takes about 2 hours on the counter. Don’t refrigerate it while still warm as condensation forms.
Once cooled, cover with plastic wrap gently. Transfer to the refrigerator for at least 4 hours. Overnight chilling is even better for slicing.
The custard needs this time to fully set up. Trying to slice too early results in runny filling. Patience here pays off with perfect slices.
TIPS, TROUBLESHOOTING & SERVING
How to Tell When Custard Pie is Done
Knowing when to remove your pie requires practice and observation. Many factors affect baking time including oven accuracy and pie plate material. Visual cues are more reliable than set times.
The Jiggle Test
Five minutes before minimum bake time, tap the oven rack gently. Don’t remove the pie from the oven. Watch how the custard moves in response.
If the entire filling looks liquid, it needs more time. Keep baking and check again in 5 minutes. Be patient during this stage.
The perfect moment is when the outer 1-2 inches are firm. The center should still jiggle like gelatin. This wobble indicates ideal doneness.
If nothing moves when you tap, the pie is overbaked. It may still taste good but won’t have the silkiest texture. Next time, check earlier.
Troubleshooting Common Issues
Even experienced bakers encounter problems sometimes. Understanding what went wrong helps you fix it next time. Here are the most common issues.
Custard Has Curdled
If your custard feels rubbery or grainy, it’s overbaked. The eggs cooked too much and lost their smooth texture. This happens when the oven is too hot.
It can also occur if you didn’t temper eggs properly. Hot milk added too quickly scrambles them before mixing. Always add hot liquid very gradually.
Check your oven temperature with a thermometer. Many ovens run hot or cold. Adjusting temperature prevents this issue in future bakes.
Filling Didn’t Set
Liquid filling after chilling means underbaking or insufficient cooling time. The custard needs both heat and cold to set properly. Give it more refrigerator time first.
If it’s still liquid after 8 hours chilled, it was definitely underbaked. The proteins didn’t cook enough to form structure. Bake longer next time.
Filling Tastes Too Eggy
Custard naturally contains eggs but shouldn’t taste unpleasantly eggy. An overpowering egg flavor indicates overcooking. The eggs scrambled slightly even if texture seems okay.
Proper tempering and scalding prevent this issue. These techniques coat egg proteins with fat and heat them gently. The result is mellow, sweet custard flavor.
Custard Is Cracked
Cracks on the surface mean overbaking or too-high temperature. The custard expanded too much then contracted while cooling. Surface tension caused splitting.
An oven thermometer helps prevent this problem. Accurate temperature control is essential. Also, don’t bake past the jiggly stage.
Pastry Is Soggy
Soggy crust has several possible causes. Insufficient blind baking is most common. The crust must be fully golden before adding custard.
Holes in the pastry let liquid seep through. Always check for cracks after rolling and patch them. Brush with egg wash to seal any small gaps.
Not cooling the custard mixture slightly before pouring helps too. Very hot custard can make bottom crust soggy. Let it cool 5-10 minutes after straining.
Edges Are Browning Too Much
If crust edges brown before custard is done, protect them. Use a pie shield or aluminum foil strips. Gently wrap just the edges.
This problem often indicates oven temperature is too high. Check with a thermometer and adjust accordingly. Lower, slower baking produces best results.
Easy Custard Pie Variations
This classic recipe adapts beautifully to different flavors. Small changes create entirely new desserts. Experiment once you’ve mastered the basic version.
Coconut Custard Pie
Add ½ cup shredded coconut to the custard mixture. Toast some extra coconut and sprinkle on top. The result tastes tropical and special.
Coconut milk can replace some of the dairy too. Use 1 cup coconut milk and reduce regular milk accordingly. This intensifies coconut flavor.
Chocolate Custard Pie
Melt 4 ounces of dark chocolate into the hot milk mixture. Whisk until completely smooth before tempering the eggs. You’ll have rich, silky chocolate custard.
Reduce sugar slightly when adding chocolate. The chocolate adds sweetness on its own. Taste the mixture to find your preferred balance.
Maple Custard Pie
Replace half the sugar with pure maple syrup. This creates a wonderful autumn-flavored dessert. The maple taste is subtle but distinctive.
Use Grade A dark maple syrup for best results. It has more robust flavor than lighter grades. Top with candied pecans for extra indulgence.
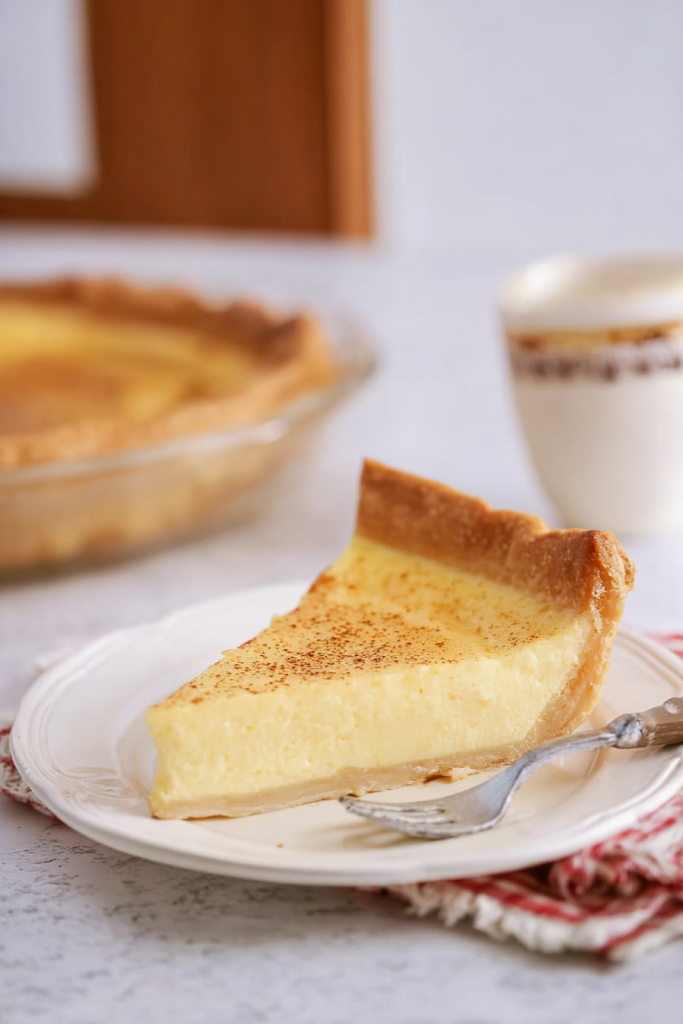
How to Serve Custard Pie
Custard pie should be served chilled but not ice-cold. Remove from refrigerator 20-30 minutes before serving. This allows flavors to bloom fully.
The custard texture is best when slightly warmer than fridge temperature. It becomes more tender and creamy. The vanilla flavor is more pronounced too.
Slice with a sharp knife dipped in hot water. Wipe the knife between cuts for clean slices. Each piece should hold its shape perfectly.
Serve plain for classic simplicity. The custard flavor shines on its own. Alternatively, add a dollop of whipped cream for richness.
Vanilla ice cream makes an excellent accompaniment. The cold, creamy contrast complements warm custard beautifully. Fresh berries add color and tartness.
Storing Custard Pie
Store covered in the refrigerator for up to 4 days. Use plastic wrap or an airtight container. The custard stays fresh and safe when properly chilled.
Don’t leave custard pie at room temperature for extended periods. The dairy and eggs can spoil if not refrigerated. Serve it, then return leftovers to the fridge promptly.
Custard pie doesn’t freeze well. The texture becomes grainy and watery when thawed. Make smaller pies if you can’t finish a whole one.
FAQs
Can I use a store-bought pie crust? Absolutely! A quality store-bought crust saves time and works perfectly. Just make sure to blind bake it properly before adding custard. Follow the package directions for pre-baking timing.
Why is scalding the milk important? Scalding denatures whey proteins which helps custard set smoothly. It also allows you to temper eggs gradually, preventing scrambling. The extra step takes only a few minutes but dramatically improves texture and flavor.
Can I make custard pie ahead of time? Yes, custard pie actually improves after a day in the refrigerator. Make it up to 24 hours before serving. The flavors meld beautifully and it slices more cleanly when fully chilled.
What if my custard is still jiggly after baking? Some jiggle in the center is normal and desired. It will firm up completely during refrigeration. If the whole pie is liquid after 4+ hours chilled, it was underbaked and won’t set properly.
Can I substitute low-fat milk or cream? I don’t recommend it for this recipe. The fat content is crucial for proper texture and richness. Lower-fat versions produce a thinner, less creamy custard that doesn’t set as well.

Perfect Custard Pie
Ingredients
- For the Pie:
- 1 recipe Pie Dough homemade or store-bought for 9-inch pie
- 1 egg + splash milk for egg wash
- For the Custard Filling:
- 4 Large Eggs
- 1 Large Egg Yolk
- 1¼ cups Heavy Cream 300ml, full-fat only
- 1¼ cups Whole Milk 300ml
- ¾ cup Granulated Sugar 150g, superfine preferred
- 2 teaspoons Vanilla Bean Paste or vanilla extract
- ¼ teaspoon Salt
- ¼ teaspoon Ground Nutmeg plus extra for topping
Instructions
- Prepare the Pie Crust:
- Prepare pie dough at least 2 hours ahead (overnight is better). Roll dough to ⅛ inch thickness and transfer to 9-inch pie plate.
- Trim edges 1-2 inches wider than pan, tuck under, and crimp decoratively. Dock bottom with fork.
- Refrigerate prepared crust for 30 minutes.
- Blind Bake the Crust:
- Preheat oven to 425°F. Line cold crust with parchment paper and fill with pie weights or rice.
- Bake for 15-18 minutes until edges are lightly golden. Remove weights and parchment.
- Brush bottom with egg wash. Return to oven for 5-7 minutes until dry and light golden.
- Reduce oven temperature to 325°F.
- Make the Custard Filling:
- In a medium bowl, whisk together 4 whole eggs, 1 egg yolk, and sugar until just combined and smooth.
- In a saucepan over medium heat, combine milk, heavy cream, and vanilla. Heat until scalding (steaming with tiny bubbles around edges). Do not boil.
- Slowly drizzle hot milk mixture into egg mixture, whisking constantly to temper the eggs. Add gradually to prevent scrambling.
- Pour entire mixture through a fine-mesh sieve into a bowl with spout. Stir in salt.
- Assemble and Bake:
- Pour strained custard into par-baked pie shell. Fill as full as possible without overflowing.
- Sprinkle ground nutmeg evenly over surface. Brush exposed crust edges with remaining egg wash.
- Bake at 325°F for 40-50 minutes. The outer edge should be set while the center still jiggles like gelatin when gently tapped.
- Cool completely at room temperature (about 2 hours), then cover and refrigerate for at least 4 hours or overnight before slicing.
Notes
Temperature Control: Use an oven thermometer to ensure accurate temperature. Too high causes curdling and cracking.
Storage: Store covered in refrigerator for up to 4 days. Do not freeze as texture becomes grainy.
Make Ahead: This pie actually improves after 24 hours in the refrigerator as flavors meld and it slices more cleanly.
Variations: Add ½ cup shredded coconut for coconut custard pie, 4 oz melted dark chocolate for chocolate custard pie, or replace half the sugar with maple syrup for maple custard pie.RetryClaude can make mistakes. Please double-check responses.
1 Comment
This custard pie looks so smooth and perfectly baked! The texture looks rich and creamy. Absolutely delicious! 😍🥧