
This cheese ball recipe? It’s been my party secret for years. Creamy cheese, crunchy walnuts, sweet dates—all rolled into one beautiful appetizer that you can make days ahead.
Look, I’m not great at planning parties.
But this cheese ball? It’s saved me more times than I can count.
Whenever I need something that looks fancy but doesn’t stress me out, I make this. And honestly, it’s become the thing people ask me to bring.
The reason it works so well comes down to three things: it’s dead simple, you can make it ahead, and it looks incredible on the table.
Here’s what makes this different from other cheese balls I’ve tried.
The goat cheese brings this tangy punch that keeps things interesting. The dates? They add little pockets of sweetness you don’t expect. And those toasted walnuts give you that satisfying crunch.
I started making this about three years ago when I got tired of bringing the same old hummus to every gathering.
My family went crazy for it.
Now? I make it for holidays, game days, even casual Friday nights with friends.
The best part is I can make it on Tuesday and serve it on Saturday. Just wrap it up, stick it in the fridge, and you’re done.
How I Put This Together
So here’s my philosophy with cheese balls.
You need contrast. Creamy inside, crunchy outside. Rich flavors, bright flavors. Everything balanced.
I always start with cream cheese because it’s the glue that holds everything together. Then I mix in goat cheese for that tangy bite.
Then I shape it into a ball and roll it in the walnut-parsley coating.
That’s it. That’s the whole process.
The One Thing You Can’t Skip
Room temperature cheese.
I know, I know. You’re in a hurry.
But trust me on this one. If you try to mix cold cream cheese, you’ll get lumps. Lots of them.
Let your cheese sit out for 30-45 minutes before you start.
Your arms will thank you. Your cheese ball will thank you.
Let’s Talk Ingredients
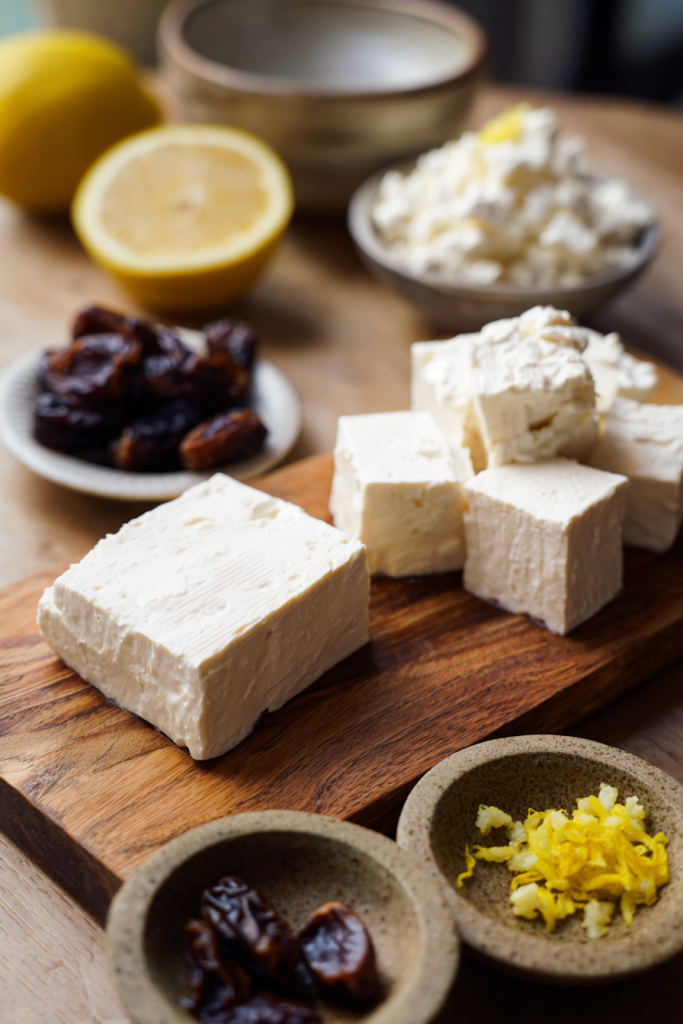
Cream Cheese: The foundation of everything. I use the full-fat stuff, but reduced-fat works too if that’s your thing.
Goat Cheese: This is where the magic happens. That tangy flavor? It’s what makes people go “wait, what’s in this?” You could swap it out for something else, but honestly, don’t.
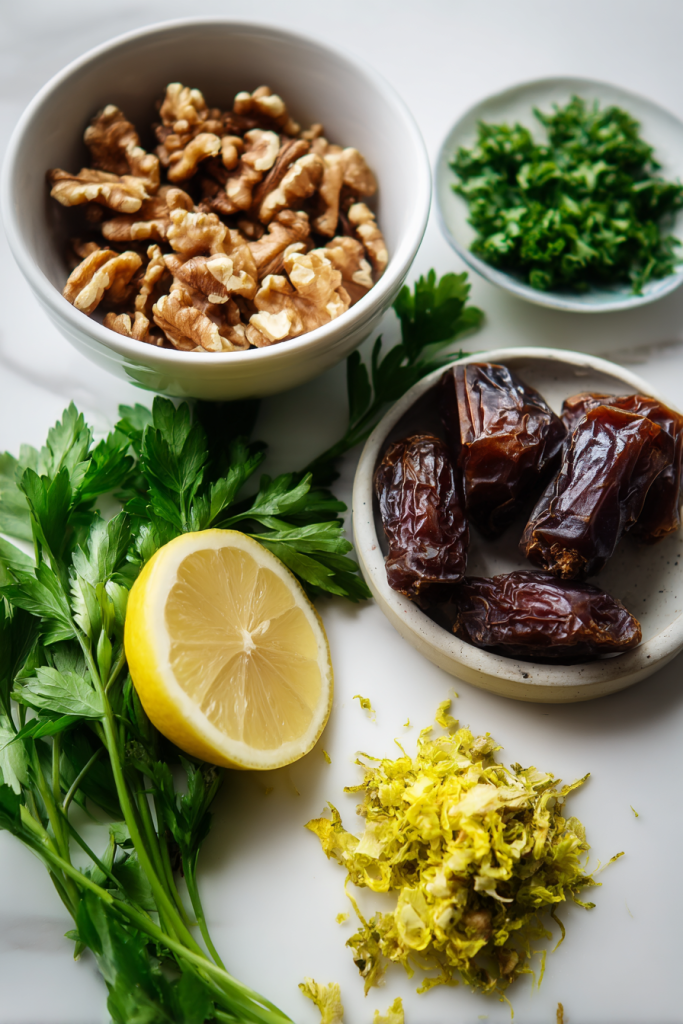
Walnuts: These little guys pack protein and fiber. But more importantly? When you toast them, they transform into something nutty and incredible.
Dates: Medjool dates are soft, sweet, and chewy. They create these little surprise moments when you’re eating the cheese ball.
Lemon Zest: Brightens everything up. Cuts through all that richness. Don’t skip it.
Parsley: Fresh herbs make a difference. They add color and a light, fresh taste.
Pomegranate Arils: Totally optional, but they make it look really pretty for holiday parties.
Why Texture Matters
I learned this the hard way.
My first cheese ball was just… creamy. All the way through. It was boring.
Now I make sure there’s crunch from the walnuts and chewiness from the dates.
Every bite needs to be interesting.
The fresh herbs and lemon zest? They keep things from feeling too heavy. You know that feeling when you eat too much cheese and it sits like a rock? Yeah, we’re avoiding that.
Toasting Walnuts (Don’t Skip This Part)
Raw walnuts are fine. Toasted walnuts are magnificent.
Seriously, it’s like night and day.
I use my oven because I’m lazy and it does all the work for me:
- Spread the walnuts on a baking sheet in a single layer
- Sprinkle with a tiny bit of salt
- Pop them in a 350°F oven
- Shake the pan around 7 minutes in
- Pull them out at 8 minutes when they smell amazing
- Move them to a bowl right away (they’ll keep cooking on the hot pan)
Once they cool down, chop them up.
The difference in flavor is wild. Raw walnuts taste like… walnuts. Toasted walnuts taste like heaven.
Make It Your Own
The great thing about this recipe? You can mess with it.
Try Different Nuts: Pecans work great here. They’re sweeter and buttery. My aunt uses pecans every time.
Add Bacon: Crispy bacon in the coating is next-level. Smoky, salty, crunchy—what’s not to love?
Switch Up the Herbs: Chives instead of parsley give you a mild onion flavor. Really good if you’re into that.
Different Cheese: Not a goat cheese fan? Sharp cheddar works. Or just add a dollop of sour cream for extra tang.
What to Serve It With
I like giving people options.
Fresh Fruit: Apple slices and pear slices are perfect. The crisp sweetness plays really well with the tangy cheese.
Crackers: I usually put out three or four different kinds. Water crackers, whole grain ones, those buttery round ones. Let people choose.
Vegetables: Carrot sticks, cucumber slices, celery. For people who want something lighter.
Bread: Toasted baguette slices or crostini if you want something more substantial.
Here’s a fun tip: leftover cheese ball makes an amazing sandwich spread.
I’ve put it on turkey sandwiches. On wraps. Even on bagels. It’s good on everything.
Storage (This Is Important)
This cheese ball keeps for a week in the fridge.
A week.
Just wrap it tight in plastic wrap after you coat it. This keeps the outside from drying out and locks in all the flavors.
Making It Ahead: I usually make mine 2-4 days before I need it. The flavors actually get better as they hang out together.
Freezing It: Wrap it in plastic wrap, then wrap it again in foil. It’ll stay good for a month in the freezer.
When you’re ready to use a frozen one, just move it to the fridge the night before. Keep it wrapped while it thaws. This keeps the texture from getting weird.
How to Serve It Right
About 15 minutes before people show up, I take it out of the fridge.
This is key.
Cold cheese ball = hard to spread. Room temperature cheese ball = perfect.
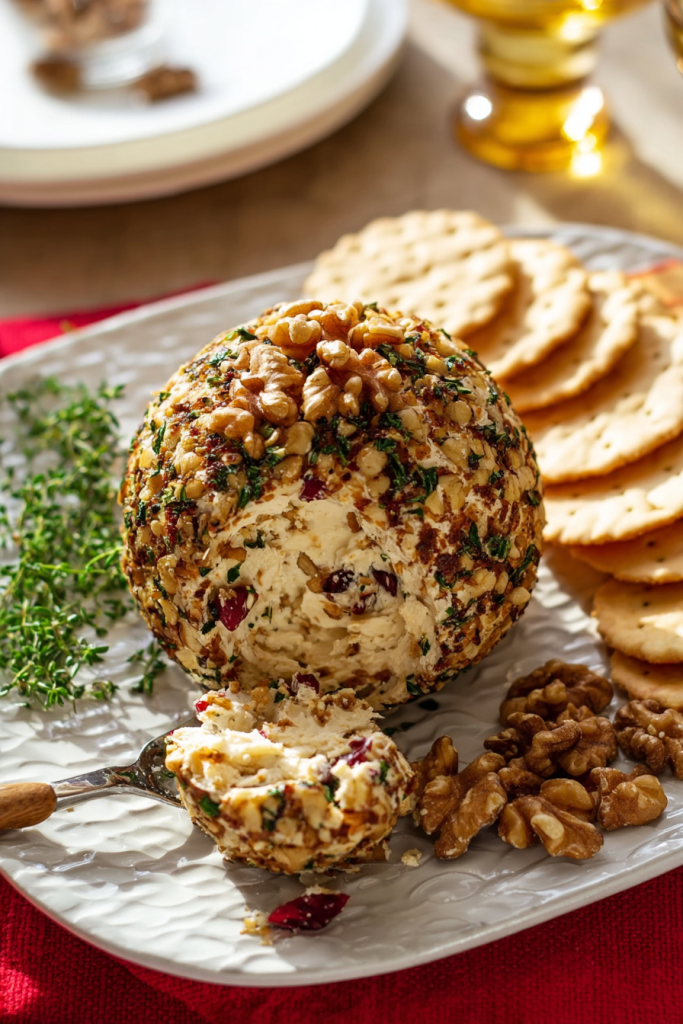
I put it on my favorite platter and sprinkle those pomegranate arils on top if I have them. The red against the green parsley looks so good.
Then I arrange crackers and fruit around it.
Done. People think you spent hours on it.
Recipe Timeline and Details
Prep Time: 10 minutes
Cook Time: 15 minutes
Total Time: 25 minutes
Servings: 4
Difficulty: Easy
Ingredient Table
| Ingredient | Quantity | Notes |
|---|---|---|
| Cream cheese | 8 oz block | Must be softened to room temp |
| Goat cheese | 4 oz log | Also needs to be soft |
| Medjool dates | 3 pitted | Chop them up really fine |
| Lemon zest | 1 tsp | Use fresh lemon, not bottled |
| Kosher salt | 1/4 tsp | Taste and adjust |
| Toasted walnuts | 1/4 cup | Toast first, then chop fine |
| Fresh parsley | 2 Tbsp | Chop it fine |
| Pomegranate arils | Optional | Just for pretty garnish |
| Crackers | As needed | Get a variety |
| Pear slices | As needed | Any kind works |
| Apple slices | As needed | I like Honeycrisp |
Step-by-Step Instructions
Step 1: Mix Everything Together
Dump your cream cheese, goat cheese, chopped dates, lemon zest, and salt into a big bowl.
Grab a sturdy spatula and start mixing.
At first it looks like a mess. Everything’s separate and chunky.
Keep going. It’ll come together.
Scrape down the sides of the bowl a few times to make sure you get everything mixed in.
Step 2: Shape It Into a Ball
Once it’s mixed, start gathering it together in the bowl. Form it into a rough ball shape.
Lay out a big piece of plastic wrap on your counter.
Plop the cheese mixture right in the middle.
Now here’s the trick: pull the plastic wrap around the cheese and use it to shape the ball. This way your hands stay clean and you can really press it into shape.
Make it as smooth and round as you can.
Step 3: Let It Chill
Stick that wrapped cheese ball in the fridge for at least 3-4 hours.
I usually just leave mine overnight.
This step is crucial. It needs time to firm up. Otherwise it’ll fall apart when you try to coat it.
Plus the flavors need time to meld together.
Step 4: Get the Coating Ready
While your cheese ball is chilling, mix up your chopped walnuts and parsley on a big plate.
Mix them together really well so you get an even coating.
Make sure your plate is big enough to roll the cheese ball around on.
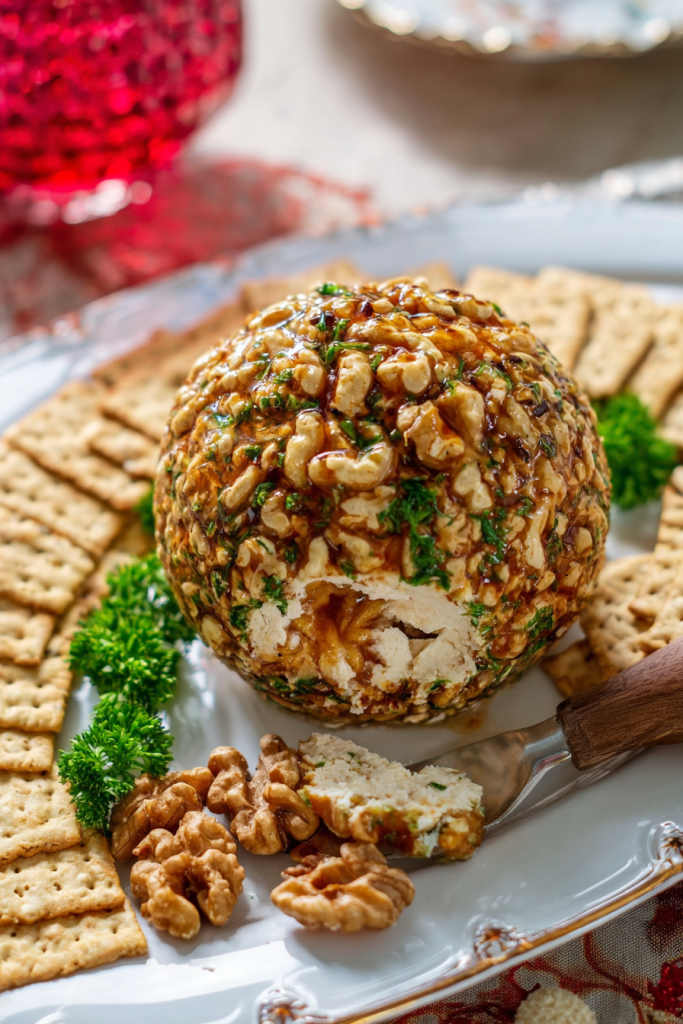
Step 5: Coat and Serve
Unwrap your cheese ball carefully.
Roll it around on the walnut-parsley mixture. Press gently so the coating sticks.
Keep rotating it until every spot is covered.
See a bare patch? Just press some more coating onto it.
Now let it sit at room temperature for 15-20 minutes before serving.
This slight softening makes it way easier to spread.
Put it on a serving plate, add those pomegranate arils if you want them, and arrange your crackers and fruit around it.
Watch it disappear.
Questions People Always Ask Me
Can I use different cheeses in this?
Yep!
The cream cheese and goat cheese combo is my favorite, but you can definitely switch things up.
Sharp cheddar gives you a bolder flavor. Cream cheese mixed with sour cream makes it extra tangy. Feta works too, though it makes the texture a bit crumblier.
Just make sure you keep cream cheese as your base. It’s what holds everything together.
My cheese ball is too soft. What did I do wrong?
You probably didn’t chill it long enough.
I always chill mine for at least 3 hours. Overnight is even better.
Also, using full-fat cream cheese helps. The reduced-fat stuff can be softer.
If yours is still too soft after chilling, mix in another tablespoon of cream cheese, then chill it again before coating.
Can I make this without dates?
Sure can.
Dried cranberries work great and add a tart edge. Dried apricots are good too.
Want to go fully savory? Try sun-dried tomatoes or roasted red peppers instead.
Each version tastes different, but they all work with the same basic structure.
How do I toast walnuts without burning them?
Watch them like a hawk. Use your nose.
Walnuts go from perfect to burnt fast. Like, scary fast.
I set a timer for 7 minutes and then I start checking constantly.
They should smell nutty and fragrant, not burnt.
Shake the pan halfway through so they toast evenly.
And pull them off the pan immediately when they’re done. They keep cooking on that hot pan even after you take it out of the oven.
How far ahead can I make this?
I make mine up to 4 days ahead all the time.
Just keep it wrapped tight in plastic wrap and in the fridge.
Need more time? Freeze it for up to a month.
Wrap it in plastic wrap first, then wrap it again in foil for the freezer.
Thaw it overnight in the fridge, still wrapped. This keeps the texture from getting weird.
Why This Recipe Actually Works
Each ingredient has a job to do.
Cream cheese is the glue. It holds everything together and gives you that rich, creamy base.
Goat cheese brings the tang. Without it, this would be one-note and boring.
Dates add sweetness and chewiness. They create these little surprise moments in every bite instead of just smooth creaminess all the way through.
Lemon zest brightens everything. It cuts through all that richness and keeps the cheese ball from feeling heavy.
Toasted walnuts deliver the crunch. The nutty depth. The texture contrast that makes this interesting instead of just creamy.
Fresh parsley adds color and freshness. It rounds everything out.
My Honest Thoughts
This has become my go-to appetizer.
Not because I’m a great cook. Because it’s easy and people love it.
The make-ahead thing is huge for me. I can cross it off my list days before the party and focus on everything else.
And I love how flexible it is. Don’t like goat cheese? Swap it. Want pecans instead of walnuts? Go for it.
The flavors work together in this way that just… works.
Sweet dates. Tangy cheese. Crunchy walnuts. Fresh herbs.
Whether you’re hosting Thanksgiving or just having people over on a Saturday, this cheese ball shows up.
It’s easy enough for beginners. Impressive enough for experienced cooks.
Give it a try. Make it your own. And enjoy all the compliments.
Equipment You’ll Need
- Large mixing bowl
- Sturdy spatula
- Plastic wrap
- Baking sheet (for toasting walnuts)
- Large plate (for coating)
- Serving platter
Recipe Notes
To Make Ahead: Make this up to 4 days before you need it. Keep it wrapped tight in the fridge until you’re ready to garnish and serve.
To Freeze: Wrap it in plastic wrap, then cover with aluminum foil. Freezes for up to 1 month. Thaw in the fridge overnight while still wrapped.
Serving Temperature: Let it sit at room temperature for 15-20 minutes before serving. This makes it way easier to spread and brings out all the flavors.
Nutrition Information
Nutrition values are calculated by hand for accuracy. Expect up to 10% variation depending on specific brands used.

Goat Cheese Ball with Dates and Walnuts
Ingredients
- 8 oz cream cheese softened to room temperature
- 4 oz goat cheese log softened to room temperature
- 3 Medjool dates pitted and finely chopped
- 1 tsp fresh lemon zest
- 1/4 tsp kosher salt
- 1/4 cup toasted walnuts finely chopped
- 2 Tbsp fresh parsley finely chopped
- Pomegranate arils optional, for garnish
- Crackers for serving
- Pear slices for serving
- Apple slices for serving
Instructions
- Mix the Cheese Base
- In a large mixing bowl, combine softened cream cheese, goat cheese, chopped dates, lemon zest, and salt. Mix with a sturdy spatula until well combined and smooth, scraping down the sides as needed.
- Shape the Ball
- Gather the cheese mixture together and form into a rough ball shape. Place in the center of a large piece of plastic wrap. Use the plastic wrap to shape and smooth the mixture into a round ball, keeping your hands clean.
- Chill
- Wrap the cheese ball tightly in plastic wrap and refrigerate for at least 3-4 hours, or overnight, until firm.
- Toast the Walnuts
- Spread walnuts on a baking sheet in a single layer. Sprinkle with a pinch of salt. Bake at 350°F for 8 minutes, shaking the pan halfway through. Remove immediately to a bowl to cool, then chop finely.
- Prepare the Coating
- Mix the toasted, chopped walnuts and finely chopped parsley together on a large plate.
- Coat and Serve
- Unwrap the chilled cheese ball and roll it in the walnut-parsley mixture, pressing gently to coat evenly on all sides. Let sit at room temperature for 15-20 minutes before serving. Garnish with pomegranate arils if desired. Serve with crackers, apple slices, and pear slices.
Notes
Freezing: Wrap in plastic wrap, then aluminum foil. Freeze for up to 1 month. Thaw overnight in the refrigerator while still wrapped.
Serving Temperature: Allow cheese ball to sit at room temperature for 15-20 minutes before serving for easier spreading and better flavor.
Cheese Substitutions: Can substitute goat cheese with sharp cheddar, feta, or add a dollop of sour cream for extra tang.
Nut Alternatives: Pecans work beautifully in place of walnuts for a sweeter, more buttery flavor.
Date Substitutions: Dried cranberries, dried apricots, sun-dried tomatoes, or roasted red peppers can replace dates.