

Tuesday night. 6:47 PM.
My stomach was growling, the kids were asking “what’s for dinner” for the third time, and I hadn’t even started cooking yet.
That’s when I threw this casserole together for the first time. I grabbed what I had in the pantry, tossed it all in a dish, and crossed my fingers.
Best. Decision. Ever.
Now? This Creamy Beef and Green Chili Casserole shows up on our table at least twice a month. My 8-year-old asks for it by name. My teenager actually looks up from his phone when I make it.
Here’s what makes it work…
It’s got everything you want in comfort food. Savory beef. Creamy, cheesy sauce. And these mild green chilies that add just the right flavor without any heat.
The prep? About 20 minutes. Then you stick it in the oven and walk away.
I’ve tweaked this recipe probably 30 times over the years. Added this. Subtracted that. The version you’re getting today is the one that made my family stop asking “what else is there to eat?”
My Picky Eater Test
You know what the real test is?
My youngest son. The kid who won’t eat anything green. Who picks peppers off his pizza. Who once cried over a piece of broccoli.
He eats two helpings of this casserole.
The secret? Those green chilies aren’t spicy at all. They just add this really nice depth of flavor. Even kids who think they don’t like “spicy food” love this dish.
Why This Recipe Just Works
Let me tell you why this casserole belongs in your dinner rotation:
First – it’s cheap. Ground beef goes a long way when you mix it with other ingredients. I can feed 8 people for under $15.
Second – it’s flexible. Throw a simple salad on the side and you’re done. Or make some Mexican rice. Or grab a bag of tortilla chips for scooping.
Third – and this is my favorite part…
It tastes better the next day.
I’m serious. Make it on Sunday. Eat the leftovers Monday through Wednesday. Each day it gets more flavorful as everything settles in together.
Plus? It reheats perfectly in the microwave. No weird textures. No dried-out edges.
The Texture Thing
Can we talk about texture for a second?
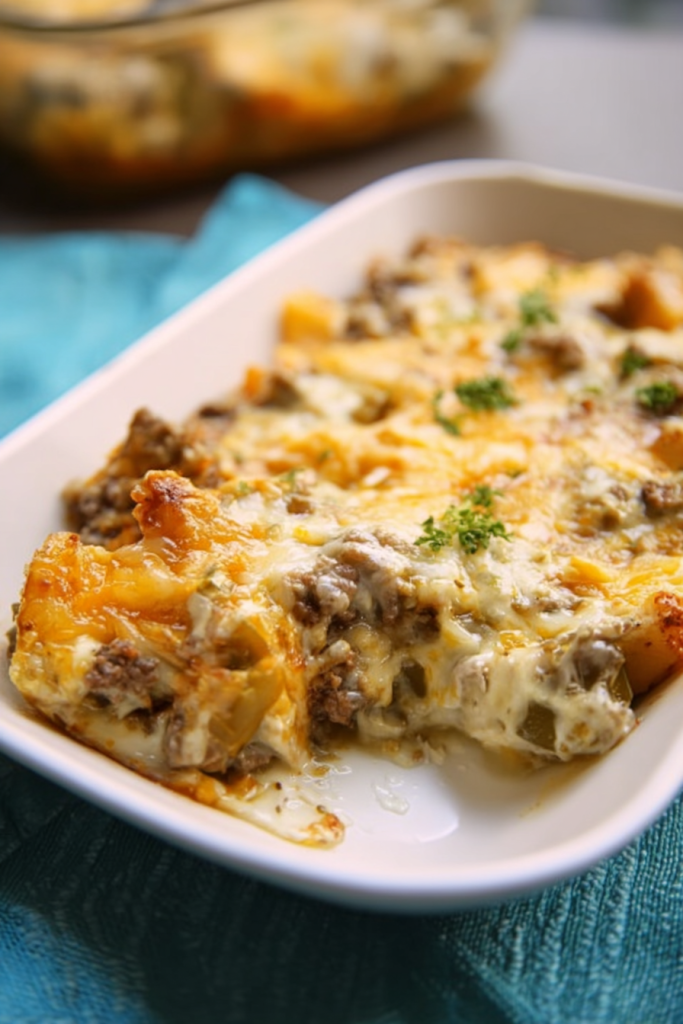
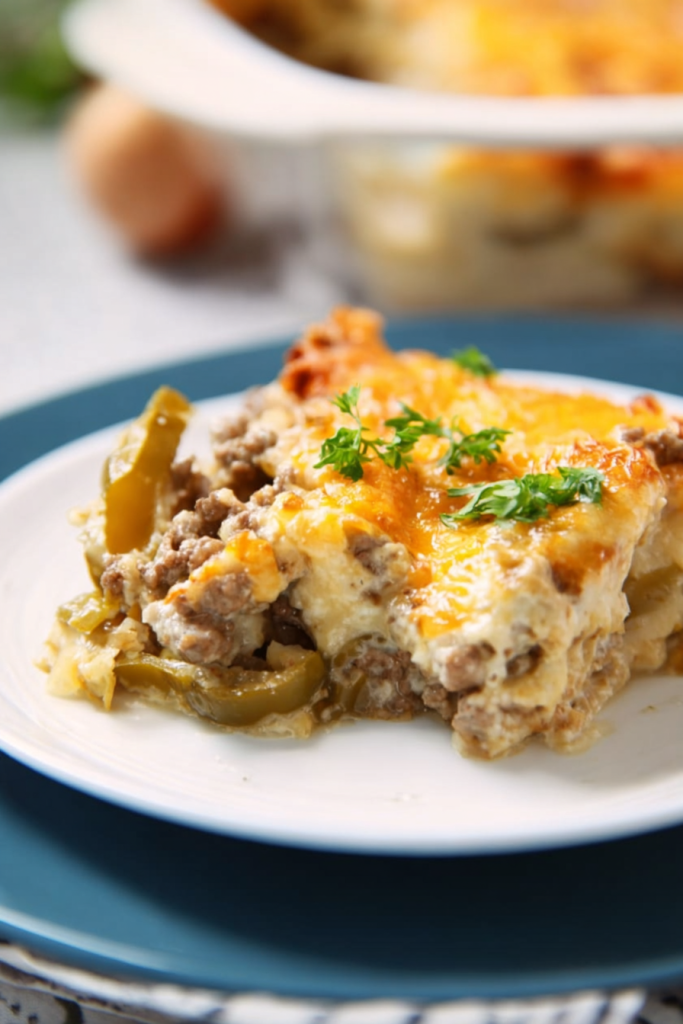
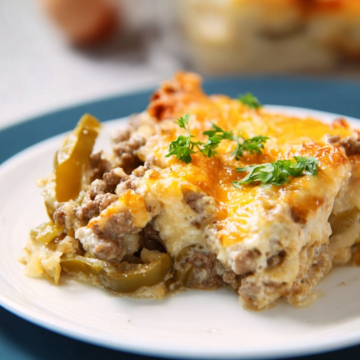
The bottom layer of crunchy tortilla chips. The creamy beef mixture in the middle. That golden, bubbly cheese on top that gets those crispy brown spots in the oven.
It’s like three different experiences in one bite.
My husband always goes for the corner pieces because they have extra crispy edges. I go for the middle where it’s super creamy and soft.
A Little Background
Quick history lesson (I promise it’s interesting):
This style of casserole comes from Southwestern cooking. You know, New Mexico, Arizona, Southern California. Places where green chilies grow like crazy and show up in everything.
They harvest them fresh every fall. And if you’ve ever been to New Mexico in August or September, you’ve probably seen those huge roasters outside grocery stores. The smell is incredible.
This casserole? It’s basically American comfort food that married Mexican flavors. And honestly, it’s a match made in heaven.
People have been making versions of this for generations. There’s something about the combination that just works.
Alright, enough talking. Let’s make this thing.
How to Make It (The Easy Way)
Quick Stats
Prep Time: 20 minutes | Cook Time: 30 minutes | Total Time: 50 minutes
Servings: 6-8 people | Difficulty: Super Easy
What You’ll Need
| Ingredient | How Much | My Notes |
|---|---|---|
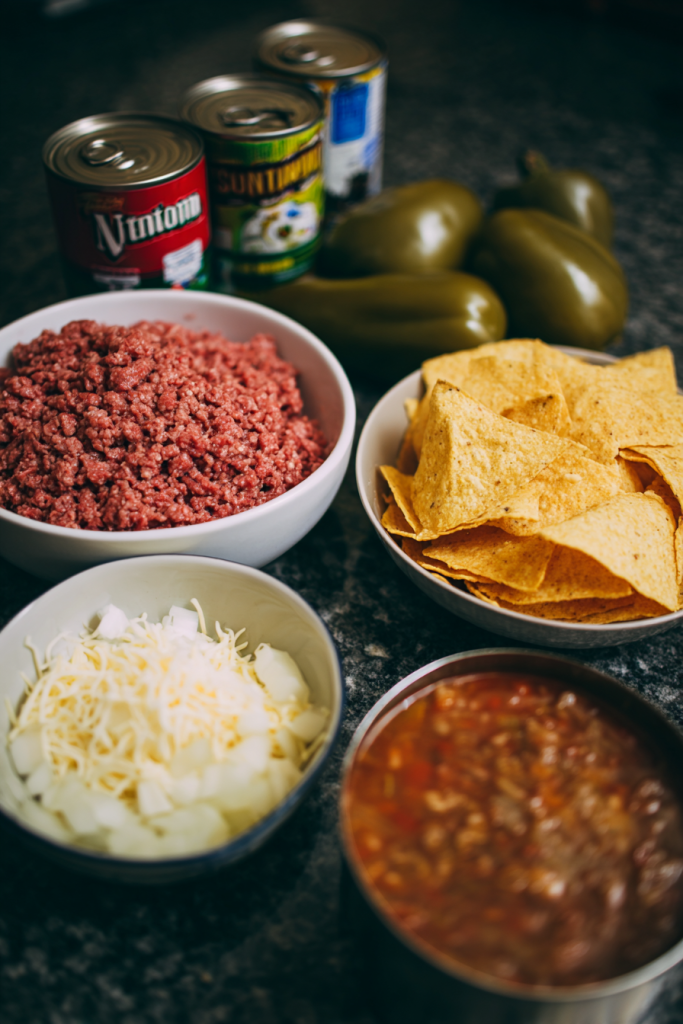
| Ground beef | 1½ lbs | I use 80/20. The fat adds flavor |
| Yellow onion | 1 large | Chop it fine so kids don’t notice |
| Cream of chicken soup | 1 can (10.75 oz) | The condensed kind, not ready-to-eat |
| Milk | 1 cup | Whole milk makes it creamier |
| Diced green chilies | 1 can (4 oz) | Start with mild if you’re nervous |
| Dried oregano | 1 tsp | Mexican oregano is worth finding |
| Garlic salt | 1 tsp | Cut back if you’re watching salt |
| Black pepper | ½ tsp | Totally optional |
| Colby Jack cheese | 3 cups shredded | Split it: 1 cup + 2 cups |
| Tortilla chips | 1 bag (10-12 oz) | Those thick restaurant-style ones |
| Cooking spray | As needed | Don’t skip this or it’ll stick |
Let’s Cook This Thing
Step 1: Get Your Oven Ready
Turn that oven to 350°F right now.
Don’t wait until later. Trust me on this.
Grab your 9×13-inch baking dish. Give it a good spray with cooking spray. Really coat it. Set it aside.
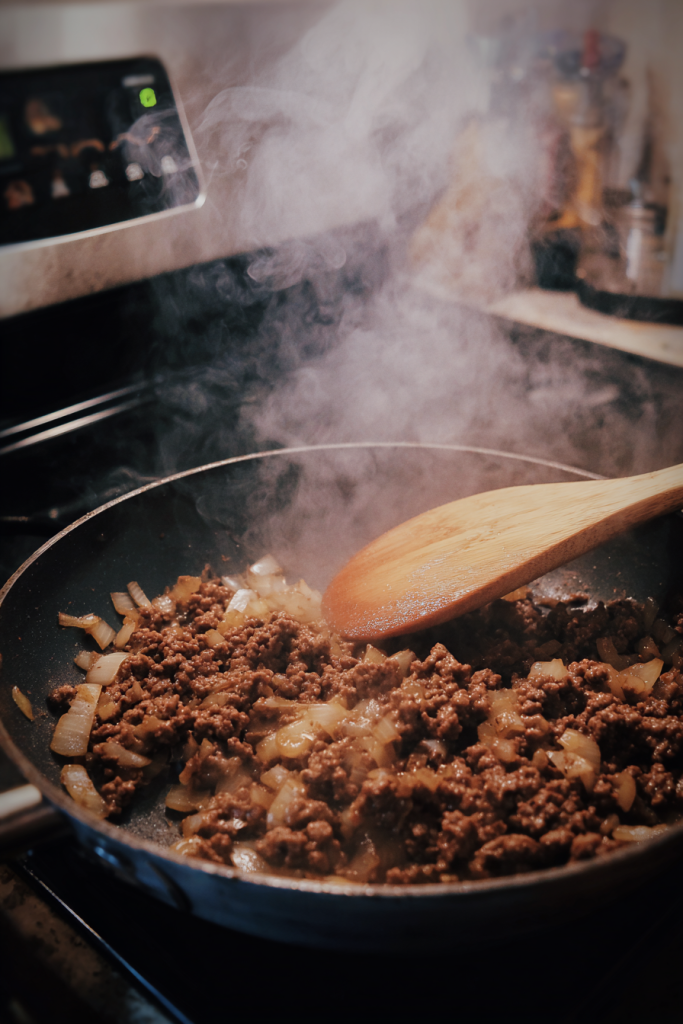
Step 2: Brown Your Beef
Put a large skillet on the stove. Medium-high heat.
Toss in your ground beef and chopped onion.
Now here’s the thing…
Break up that meat as it cooks. Use a wooden spoon or one of those meat chopper tools. You want small crumbles, not big chunks.
Cook for 8-10 minutes. Stir it every couple minutes.
You’re looking for:
- No pink left in the beef
- Onions that look soft and a little translucent
- Nice brown bits forming on the bottom of the pan
Got excess grease pooling? Drain it off. Pour it into an old can or jar, not down your sink.
Step 3: Make It Creamy
Turn the heat down to medium-low.
Drop that can of cream of chicken soup right into the skillet with the beef. Don’t dilute it first.
Pour in your milk.
Stir it all together.
It’s gonna look really liquidy at first. That’s normal. That’s good.
Now add:
- The whole can of diced green chilies (liquid and all)
- Your oregano
- Garlic salt
- Black pepper if you want it
Stir everything together really well.
Let it bubble gently for 2-3 minutes.
The whole kitchen should smell amazing right now.

Step 4: First Cheese Addition
Grab 1 cup of that shredded cheese.
Sprinkle it into the skillet.
Stir it in. Keep stirring until it completely melts into the beef mixture.
This is what makes it really creamy.
Turn off the heat.
Step 5: Build Your Layers
Okay, this is the fun part.
Take about half your bag of tortilla chips. Spread them across the bottom of your baking dish.
Break the big ones to fill gaps. It doesn’t need to look pretty. Nobody’s judging.
Spoon half of your beef mixture over those chips. Use the back of your spoon to spread it around.
Now another layer of chips. Same deal. Break them up. Cover the beef.
Top with the rest of your beef mixture. Spread it out nice and even.
Step 6: Cheese Crown Time
Remember those 2 cups of cheese you saved?
Dump them right on top of your casserole.
Spread them out so they cover everything. Get it all the way to the edges.
This is what’s gonna turn golden and bubbly and crispy in the oven.
Step 7: Bake It
Pop that dish in your preheated oven.
Set a timer for 30 minutes.
Don’t cover it. Let it bake naked.
You’ll know it’s done when:
- The cheese is melted and bubbling
- You see golden brown spots on top
- Your kitchen smells like heaven
- You can’t wait another second to eat it
Pull it out. Let it sit for 5 minutes before you dig in.
I know it’s hard to wait. But those 5 minutes help it set up so it doesn’t fall apart when you scoop it.
My Best Tips (Learned the Hard Way)
Tip 1: Drain that beef if it’s greasy.
I learned this one when my first attempt turned into a grease pool. Not cute.
Tip 2: Shred your own cheese.
I know the pre-shredded stuff is convenient. But it’s coated with anti-caking stuff that doesn’t melt as well. Fresh shredded cheese makes this so much creamier.
Tip 3: Love green chilies? Use two cans.
Even with double the chilies, this stays mild. It just gets more flavorful.
Tip 4: Cool it completely before storing.
Hot casserole + plastic container = condensation = soggy mess the next day.
Let it cool on the counter. Then cover and refrigerate. It’ll keep for 4 days.
Making It Your Own (Plus Answers to Your Questions)
What to Serve With It
This casserole is pretty filling on its own. But here’s what I usually do…
A simple green salad with lime vinaigrette. The acid cuts through all that richness perfectly.
Or Mexican rice. Or cilantro-lime rice. Both are great.
Want to go all out? Set up a little toppings bar:
- Warm flour tortillas
- Fresh guacamole
- Sour cream
- Pickled jalapeños for the brave ones
Ways to Mix It Up
Chicken Swap
Use shredded rotisserie chicken instead of ground beef. Just add it where you’d normally put the browned beef. Super easy.
Veggie Boost
Stir in a cup of corn kernels or black beans with the beef mixture. More nutrition. More texture. Still tastes great.
Heat It Up
Grab hot green chilies instead of mild. Or dice up a fresh jalapeño when you’re browning the beef.
Different Cheese
Try Mexican blend. Or sharp cheddar. Or straight-up Monterey Jack. They all work.
Extra Crunch
Crush up some tortilla chips. Sprinkle them over the cheese for the last 10 minutes of baking. So good.
Storing and Reheating
In the fridge:
Airtight container. Up to 4 days.
And honestly? Day 2 is better than Day 1. The flavors really come together overnight.
Reheating:
Single serving? Microwave for 1-2 minutes.
Big portion? Oven at 350°F for 15-20 minutes. Cover it with foil so it doesn’t dry out.
Freezer friendly?
Yes! Here’s how:
Assemble the whole thing. Don’t bake it yet.
Wrap it tight with plastic wrap. Then add a layer of aluminum foil.
Freeze for up to 3 months.
When you’re ready to use it, thaw overnight in the fridge. Bake as normal.
Your Questions Answered
Q: Can I make this ahead?
Absolutely.
Put it together up to 24 hours before you need it. Cover with plastic wrap. Stick it in the fridge.
When you’re ready to bake, pull it out. Let it sit on the counter for 15 minutes while your oven preheats.
Then bake as usual. You might need an extra 5-10 minutes since it’s starting cold.
Q: No cream of chicken soup. Now what?
No problem.
Cream of mushroom works just as well.
Or make a quick white sauce. Melt 2 tablespoons butter. Whisk in 2 tablespoons flour. Slowly add 1 cup chicken broth while whisking. There’s your substitute.
Q: Are green chilies really mild?
Listen…
I get this question all the time.
Canned diced green chilies are so mild it’s almost funny. They add flavor, not heat.
My kid who cried over a bell pepper? Eats this happily.
Still worried? Use half a can the first time. See how you like it. Adjust from there.
Q: Can I use actual tortillas instead of chips?
You can!
Cut corn tortillas into strips or squares.
Fresh tortillas work fine. Or bake them at 350°F for 10 minutes first if you want them crunchier.
Q: Why is my casserole watery?
Two things usually cause this:
First – you didn’t drain the beef well enough. Fix: drain it better next time.
Second – you didn’t let the beef mixture simmer. Those 2-3 minutes of simmering help thicken everything up.
The good news? The tortilla chips absorb liquid as it bakes. So even if it looks a little soupy going in, it usually comes out perfect.
Final Thoughts
This casserole shows up in our house constantly.
It’s easy. It’s cheap. It feeds a crowd. And everybody actually likes it.
Those are four things that rarely happen with the same recipe.
Give it a shot tonight. I bet it becomes a regular at your table too.
Creamy Beef and Green Chili Casserole
Ingredients
- 1½ lbs ground beef 80/20 recommended
- 1 yellow onion large, finely chopped
- 1 can cream of chicken soup 10.75 oz, condensed
- 1 cup milk whole milk preferred
- 1 can diced green chilies 4 oz, mild
- 1 tsp dried oregano Mexican oregano if available
- 1 tsp garlic salt
- ½ tsp black pepper optional
- 3 cups Colby Jack cheese shredded, divided (1 cup + 2 cups)
- 1 bag tortilla chips 10-12 oz, thick restaurant-style
- cooking spray as needed
Instructions
- Preheat oven to 350°F. Spray a 9×13-inch baking dish with cooking spray and set aside.
- In a large skillet over medium-high heat, cook ground beef and chopped onion for 8-10 minutes, breaking up the meat into small crumbles. Cook until no pink remains and onions are soft and translucent. Drain excess grease.
- Reduce heat to medium-low. Add cream of chicken soup, milk, diced green chilies (with liquid), oregano, garlic salt, and black pepper to the skillet. Stir well to combine.
- Let the mixture simmer gently for 2-3 minutes, stirring occasionally.
- Add 1 cup of shredded cheese to the beef mixture. Stir until completely melted. Remove from heat.
- Spread half of the tortilla chips across the bottom of the prepared baking dish, breaking large chips to fill gaps.
- Spoon half of the beef mixture over the chips and spread evenly.
- Add another layer of tortilla chips, then top with remaining beef mixture, spreading evenly.
- Sprinkle the remaining 2 cups of shredded cheese over the top, covering to the edges.
- Bake uncovered for 30 minutes, until cheese is melted, bubbly, and golden brown in spots.
- Remove from oven and let rest for 5 minutes before serving.